
Thumbnail Credits: Ethan Butler / TikTok: @Ethan5002
Are you overwhelmed?
Have you been looking at trying to install an aftermarket steering-wheel in your Mazda but confused and frankly overwhelmed by the options out there? I’ll clear everything up for you. Letting you make all the right decisions.
What parts do I need to buy?
Let’s briefly speak of all the necessary parts you’ll need and what is optional.
Boss kit
What does a boss do and what comes in the kit? So a boss allows the vehicle specific steering-column spline to be converted into an aftermarket friendly bolt pattern to attach either a quick-release and then a steering-wheel OR a steering-wheel directly. There’s two common PCD’s in regular aftermarket steering-wheels intended for street-derived vehicles. Nardi/Personal is 6x74mm PCD. A Nardi wheel can be easily identified by two bolts at the very top in the 11 o’clock and 1 o’clock position. Whereas Sparco use 6x70mm. Which is rotated by 30 degrees and has a single bolt at the 12 o’clock position.


Now you understand the purpose of a boss in a boss kit, what else comes in the kit then? Well typically a boss kit will include the boss itself, a plastic shroud for the boss (depending on boss), a new nylock or locking nut, SRS resistors.

It is recommended that you use the original locking nut that came off of your factory steering-wheel. Now the shroud is simply a cosmetic item for boss kits like WorksBell variety where unlike NRG boss’s they aren’t round or cosmetically pretty as is. So they have a plastic shroud that sits over them once they have been installed over the shaft and the locking nut tightened.

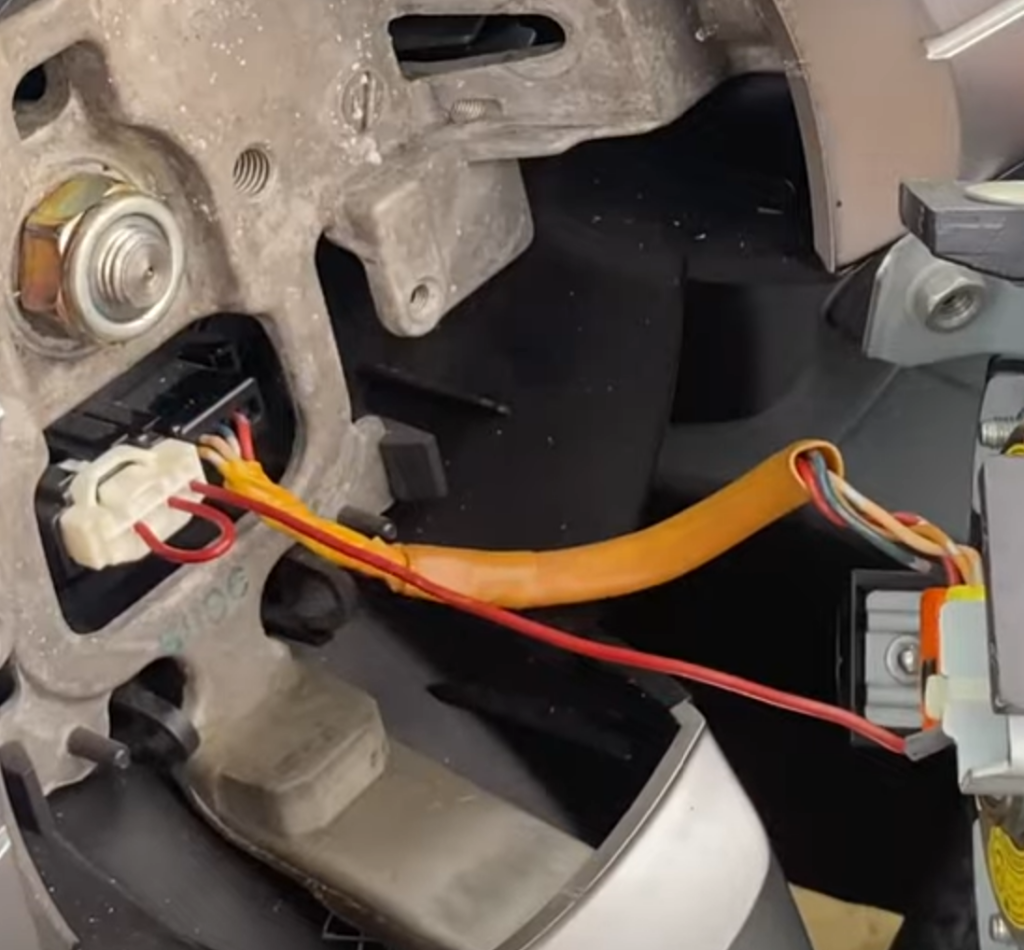
As for the SRS resistors, they are for those that still retain the SRS ECM (ECM with yellow plugs coming out of it that on a NC is situated directly behind the cigarette lighter on the transmission tunnel). What they do is allow the rest of the SRS system (your airbags) to operate as they did before with a steering-wheel without an airbag. What the resistors do is place a faux load on the SRS steering-wheel signal line tricking the SRS ECM into working as was before. It’s worth mention early cars 2005-2008 (NC1) only require one resistor. Which if you loose yours or your kit doesn’t come with them (usually a bad sign of a poor kit) then you’ll need a 2.0Ohm 0.5Watt resistor. If you car is 2009-2013 (NC2) or 2013-2015 (NC3) then you’ll need two resistors. It’s best to mention that once the legs of your pre-supplied resistors from your chosen kit are inserted into the SRS yellow connector. You should use some Tesa or equivalent high quality electrical tape and tape up the connector and your new resistor(s) so that they stay put in the yellow connector(s) and they don’t short out to the inside of the boss. Use some common sense here and you’ll be sound.

This is the factory SRS ECM we’re talking about. It is located behind the heated-seats switch-gear. Situated on top of the transmission-tunnel. The load of the airbag explosive charges is 2.0 Ohm. So we can replicate that when they no longer exist with a 2.0 Ohm 0.5watt resistor.
Lastly and depending on your use of the vehicle. You may or may not require by law. That is the horn. So the clockspring is essentially a rotating assembly with a ribbon-cable wrapped up inside that allows passing electrical connections through the wheel while allowing full steering movement and lock without issues. From the clockspring will be a slot for a white wide connector. This connector will pass the electrical leg of your horn relays coil (NEG) inside your steering wheel for the horn button to then complete that switch-line (GROUND) to the metal of the boss and then the steering-column and column brackets that ultimate ground out to the chassis as a return path to the negative terminal of the vehicles 12V battery. Yes your horns relay coil is fed 12VDC when ignition is on and your horn is just completing the return path. It does not provide the horn 12VDC. Your horn due to it’s power draw also known as current consumption uses a relay which is common practice in the automotive world. The switching is all low amperage. Anyways, the horn connector simply pushes in to the factory port in the clockspring (rotating assembly) and will have a female spade connector coming from one wire away from the white plug.
Technically the last thing is actually not always provided. But there are spacer rings you install that depending on how you want to do the horn button can create continuity to ground on a setup that’s powder-coated. Essentially it just creates a fly-lead using the new pairs of PCD (holes) and will allow your quick release or steering-wheel to have continuity to chassis ground.
Quick Release (Optional)
A quick release simply allows quick disconnection of the steering-wheel which may aid the drivers entry and exit of the vehicle. There many different types. The classic style by WorksBell is what NRG clones copy. Tells you something right? There’s a reason the genuine item costs so much. Speaking from personal experience get the WorksBell gen 2.0 if you want this style quick release. After having the NRG quick-release and daily use several years ago it developed a wobble. There was play/thrust that although by design the wheel would not release and fail. It wasn’t confidence inspiring. So I got a replacement through my vendor and sold that to a mate. Then brought the WorksBell gen 2.0. Not cheap lol but you can feel the difference and the cost reason. The WorksBell is heat-treated (induction-hardend steel).

There are other designs from the likes of DND Performance Interiors. They make some nice kit and they have a spline style design which is older than the self-centering-ball-bearing design of the WorksBell unit. However that design does not allow for a horn button. Lastly there are quick-releases that use a spline-style design that have a center hole for a quick release Deutsch motorsport/clubsport connector for a competition vehicle running additional steering-wheel buttons without using curly-cords and a GX-Aviation connector (my personal method). Or wireless buttons. More on that later.

It’s worth mentioning even for a short person like myself if you want a quick-release then you aught to use a “short” variant hub so your steering-wheel is not too far back when you add the quick-release. If you do not want a quick-release it is suggested you go with a “long” boss kit for a permanent mounting.
Steering-wheel
Everyone knows what a steering-wheel is, so let’s skip the explanation and jump head first into the different types, styles and sizes of steering wheels you need to know about before spending your hard-earned money.

The most common size of steering-wheel is a 350mm wheel. This size is very close to your stock steering-wheel from the factory. It is quite a good size and will enable you to still read your gauge-cluster with no obstruction. You can however go to a smaller size steering-wheel, a few people do this in really small cars where interior space is limited and the benefit is a little more leg-room. However speaking of the NC/MK3 chassis I personally would recommend you stick to a 350mm wheel.

That’s great now I know the size, what else is their? Well secondly you’ll need to choose the style of steering-wheel you’ll want to use. Aftermarket steering-wheels come in mainly two different categories. That is “deep dish” (like the name suggests the wheel has depth and will ultimately sit closer to your body) and the second is “flat” this is also straight-forward to understand.
The third thing is the material you’ll want. Speaking from experience leather steering-wheels are the most durable and can be driven daily with no need for any gloves. They are also nice if you don’t wish to wear gloves at the track-day. Personal experience right? The other main option is suede. Now suede steering-wheels may look awesome to some, they have a massive drawback for driver’s who wish to keep their car for some time.. That is without wearing driving-gloves the oils in your skin will deteriorate the suede material and can change the feel. Not good. However if you are going to be mainly driving your car predominately around the track then a suede steering-wheel with proper gloves will be a good choice! In fact some claim that suede wheels will have a slightly better grip with gloves, perfect for a true racecar. You may also like to have a wooden steering-wheel. A massive throwback to classic cars, a wooden steering wheel will look great in a vintage style car. To get the best feel of a wooden-steering wheel it is recommend to use a pair of leather driving-gloves. This is also where the term “glovebox originates from”. The last real material you’ll see is neoprene. This material will feel similar to your stock-wheel and is cheaper to produce than a leather wheel but is not as durable as a leather-wheel.
Summary and my recommendations
So let’s end this article with personal recommendations for those totally unsure. So my favorite steering-wheel is an Italian leather wheel made by Personal(a Nardi company). It is the Neo Grinta 350mm leather. They do also make a suede option. I would highly discourage a suede steering-wheel in a daily vehicle where you will not be wearing driving-gloves 24/7. Natural oils found on your skin, means your hands will ruin the suede if in constant contact. Cleaning suede is also a massive pain in the arse in comparison to a factory vinyl or genuine leather steering-wheel. My Personal Neo Grinta 350mm leather wheel is pretty trick because it has a red stitch. I have seen other options for a blue and yellow stitch. Although harder to come by. As for the boss since I use a quick-release (you guessed it) I use a WorksBell short boss for the NC/RX-8. Paired with a WorksBell Rapidfix 2 in black. You may be wondering where I got my carbon-fiber switch-gear from? That was a custom order by Volantech. It’s the only carbon-fiber on the car currently lol.
If you’d like to purchase the same components I use in my own vehicle then the links are below.
Part links
Disclaimer
I need to inform you that I am not a legal advice expert. I am therefore not responsible for any of your actions that may have consequences. That now said, for those who want an aftermarket steering-wheel (one without an airbag) in their car in the United Kingdom must be aware you will fail an MOT if your vehicle does not have superseded safety equipment from factory. For example you must have FIA spec bucket seats, FIA spec harnesses (ideally six-point), aftermarket rollbar or roll-cage, optional door bars. By having FIA spec equipment you’ve now superseded the factory safety equipment. That said, you must ensure the FIA spec equipment is installed correctly and thoroughly. In particular the angles of the harnesses when the driver is sat in the vehicle. If not set correctly and bolted in the right position, in the event of an accident the outcome could be fatal. Please refer to your harness manufacturers installation instructions for a correct install. If the necessary additional safety equipment is present in the vehicle then the vehicle can be tested similar to a rally-car where it is roadworthy but certain rules no longer apply to it. Deeming it safe and sound for road use.
So now you’ve decided on your parts. Let’s get into how to install your new parts. Please continue this article by navigating to the second page below.
Leave a Reply